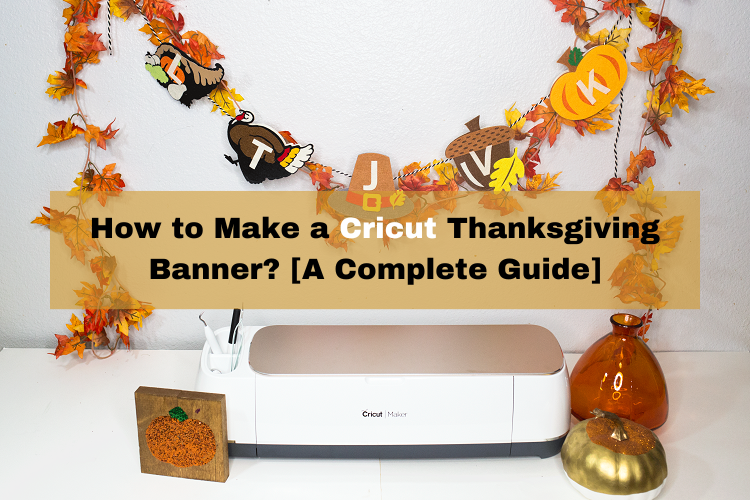
Ever since Halloween, I have been looking forward to Thanksgiving as it is time to start thinking about turkeys again. There’s no doubt that Thanksgiving can be a stressful holiday, but it’s also a great time to gather with friends and family to eat great food and relive childhood memories. This year, I am thinking of taking forward and designing a Cricut Thanksgiving banner myself.
No matter how hectic it will be for me to arrange everything when I start to design the banner, I will still never look back. A customized Thanksgiving banner made by the Cricut machine will make my spirit more creative and show everyone my skills. Read this tutorial as I will teach you all the basic steps to take to design a banner.
Step 1: Sign in to Design Space and Create a Design
Before physically forming the Cricut ideas for Thanksgiving, all the DIYers need to sign in to their Design Space account. After getting signed up, they can start creating the Cricut Thanksgiving banner design. Read the following steps to learn about the process:
- First, open the Design Space app and sign in by entering your login details.
- Second, press the New Project option, and you will land directly on the canvas.
- Next, I choose the Images toolbar and type the banner inside the search bar.
- Now, choose any one of the banner styles and then press the Insert Images option.
- Following this, resize the banner and then add Text inside it using the Text toolbar.
- After typing the Text, I changed its font, size, and style from the Dropbox menu.
- Now, choose flowers for your Cricut Thanksgiving banner by going back to the Images section.
- After reaching the section, choose your favorite flowers and leaf from the library.
- Following this, change your flower and leaf color and size as per your preferences.
- Now, press the Make It option appearing on the top-right side of the canvas.
- After pressing the Make It option, choose your material from the Browse Materials dropbox menu.
- Now, press the Continue option given at the bottom right side of the screen.
Step 2: Load Materials Into the Cricut Machine
- After selecting the material, gently put it on the top of the cutting mat and then insert it inside your craft plotter.
- Next, you need to press the blinking C button, which means that the means are ready to cut down the material.
- After your craft plotter finishes the cutting process, unload the mat and peel off the material.
- Following this, I will weed out designs with my weeding tool and place them in the corner of your table.
Step 3: Cut Banner Pieces
- When the weeding process is complete, spread glue over the back side banner pieces.
- After spreading the glue, place the piece on the top of the other banner design.
- Now, take one alphabet, spread glue over it, and settle it on one banner piece.
- Follow the process by settling down other alphabets on the remaining ones.
- After placing the alphabet on the pieces, load another material, and it will start cutting down your flower and leaf patterns.
- Following the completion of the cutting process, peel the flower design from the mat.
- Next, rotate the flower material and make it in the form of a flower.
Step 4: Put All the Designs Together
After finishing wrapping up the above-said steps, it’s time to finally conclude Cricut ideas for Thanksgiving process. In order to do so, you need to follow these steps:
- Now, I will take a Cricut glue gun and spread small drops of glue around the flowers.
- After doing this, place them on the top left side of the banner piece.
- Next, repeat the same by placing the flower and leaves on the remaining pieces.
- Following this, take a strong thread or ribbon and start inserting it inside the holes.
- Now, I will hang the banner in the correct position on your wall or outside your front door.
Viola! My house is all ready to welcome the guests for a housewarming party served with drinks & tasty dinner.
Conclusion
Do you have any extra Cricut materials or supplies lying around the corner of your house but don’t have any idea about how to utilize them? Now, you know what you have to do with them. With the cut-die machine, you can create a Cricut Thanksgiving banner of various materials, shapes, and designs. Other than that, one needs to be very careful while making their respective banners. Besides, you can also create different crafts such as custom patterns, cards, gift tags, and many more. From now on, the sky is your only limit.
Frequently Asked Questions
What Materials Should I Buy to Create My Cricut Thanksgiving Banner?
In order to make top-class customized Cricut banners for Thanksgiving on your own, you have to have some of the crucial supplies. Those supplies will assist you in transforming your DIY dreams into reality. Have a look at the crucial supplies from the list below:
- Cricut cutting machine
- Design Space
- Cricut cutting mat
- Weeding tool
- Scraper tool
- Cricut glue gun
- Ribbon
How Can I Create My Own Custom Banner for Thanksgiving in 2023?
Read the following steps to learn about how to create a custom Thanksgiving banner:
- First, sign in to Design Space and create your design on your canvas.
- Second, insert your material into your machine and wait till the cutting process is going on.
- Next, weed out the design from the cutting mat and stick it on the banner pieces.
- Finally, insert rope into the banner holes and then tie it to your house walls or chimney.
Do I Need Design Space to Create Cricut Thanksgiving Banners?
In order to create a customized Thanksgiving banner, it’s compulsory for all the crafters to have Design Space with them. The app offers tons of images, fonts, and ready-to-make projects absolutely for free. Other than that, you can also download the app to your PCs and smartphones. Besides, you also get a Cricut Access plan along with the software with the ever-growing library on a monthly & yearly basis.
For more information visit: Cricut.com setup mac
design.cricut.com/setup
Cricut machine setup
install cricut design space app
How to Install Cricut Design Space

Leave a comment